
Summary
Rewards
Points System
Breaches
Combat Bracket Worlds
Drop Rates
Quest Unlocks
Global Loot Table
Blighted Overloads
Prayer Changes
Corrupted Weaponry
Sigil Changes
Finale
We've had feedback on a whole host of things from many of you since giving you a first look at Deadman: Armageddon, some broader topics and some relatively niche ones.
The table below aims to capture as many of these points as possible and give us a chance to respond, take a look! The table is massive so we've popped it behind a drop-down for now.
Click here to see the feedback/changes table!
Note: Due to technical limitations and character limits on our newsposts, the below table is technically an image. We apologise for any inconvenience, particularly for those of you using screen readers. If you're unable to see the table below, click here instead.

There's every chance we revisit this list in the future, but we'll make sure to let you know if we're adding more or making changes! We're grateful for all of your feedback so far and always on the lookout for more, see you in Deadman: Armageddon on July 19th!

Last year, tens of thousands of you fought to the death in the face of an apocalyptic threat to Gielinor. After all was said and done, five of you remained to preside over the ashes for a brief moment before the inevitable: apocalypse.
Fortunately, the magic of Old School is that a world or two ending isn't such a big deal, because we can always spin more worlds up. This year, we're building on the success of Deadman: Apocalypse to bring you 2024's Deadman: Armageddon!
Read on to see all the changes we�ve made since last time. If you missed the boat on last year's Deadman, we'd recommend taking a look at this summary from the fantastic OSRS Wiki to add some extra context to what you're reading about.
We'll kick things off with one of the most-requested features of the last few years�
Ever since we made cosmetic rewards available through Leagues, you�ve been clamouring to see them in Deadman Mode, too.
This year, we're looking to make this a reality by offering up a variety of cosmetics to appeal to PvP veterans and novices alike.
Incidentally, we already have a handful of items with unique appearances in the form of the Corrupted Weaponry - obtainable variants of powerhouses like the Dragon Claws, Voidwaker, and even the Twisted Bow. We'd like to allow players to purchase tradeable main game kits using Points accumulated during Deadman - the same way players unlock cosmetic kits from the Leagues Reward Shop. On top of the ones you've seen before, you'll also have a Dark Bow and Volatile Nightmare Staff override to look forward to � more on those in a moment.
Note: Please keep in mind that some of the following images are early concepts and that some visual elements may change ahead of release if you vote for us to begin development in next week's poll.
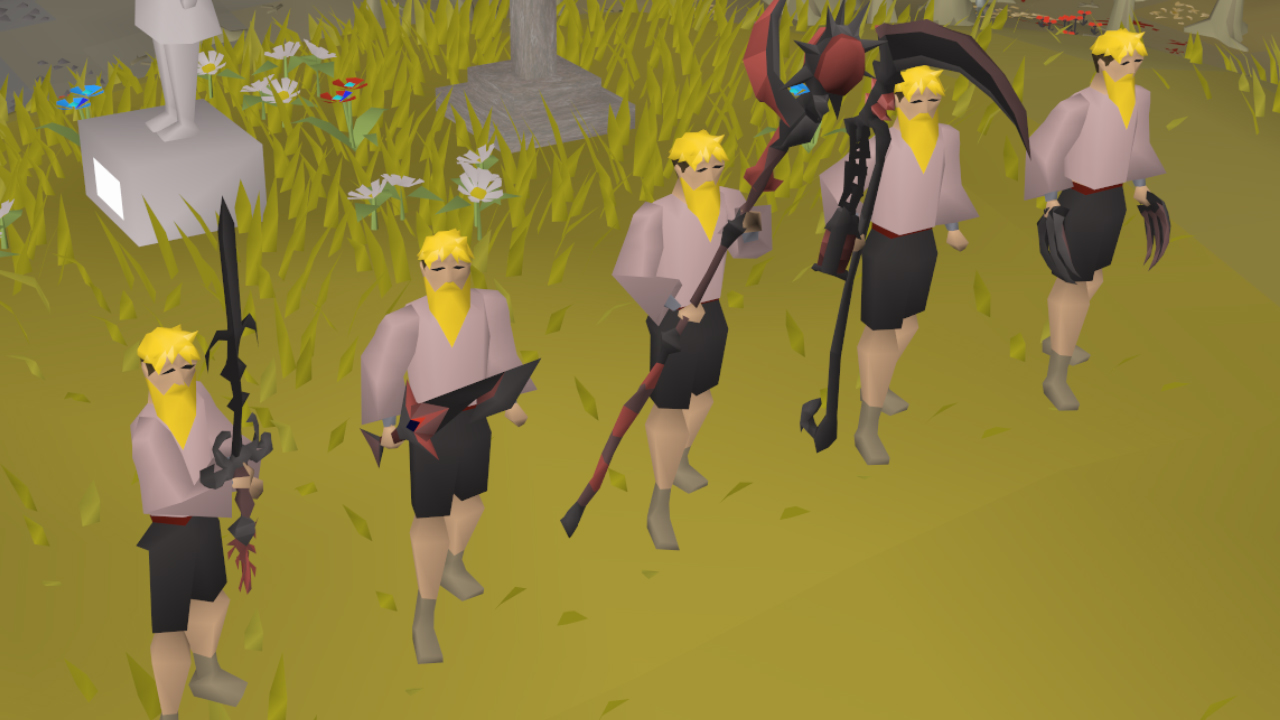
Here's five identically-dressed fellows sporting the original Corrupted Weaponry in case you need a refresher on the original Corrupted weaponry!
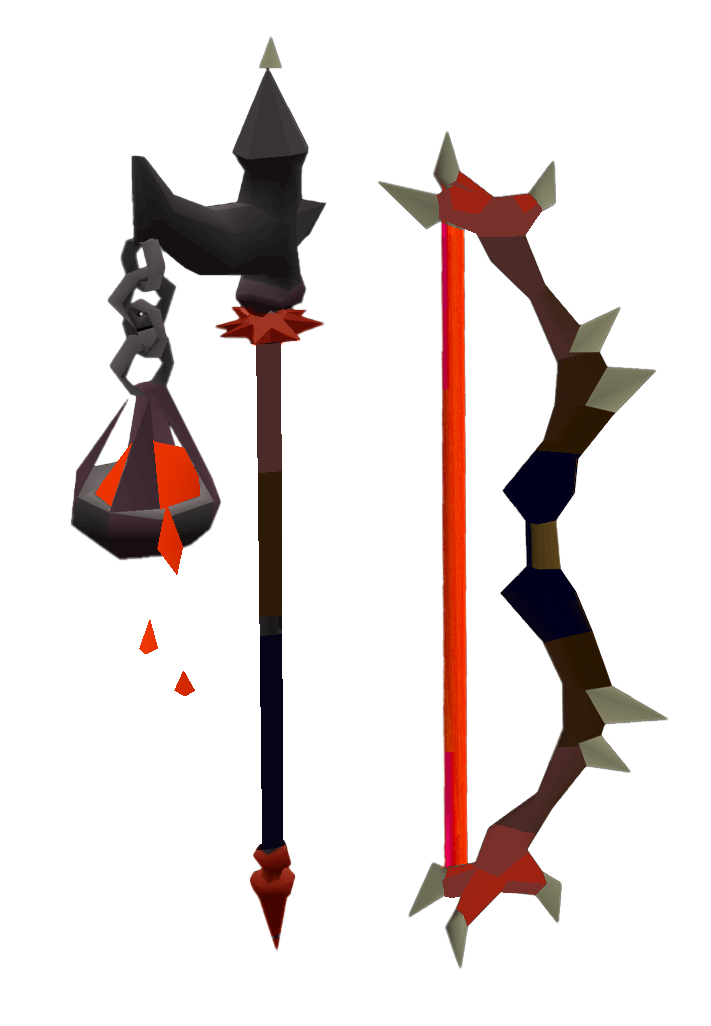
This is how we expect the Corrupted Volatile Staff and Dark Bow to look in Deadman: Armageddon, and in the main game if unlocked!
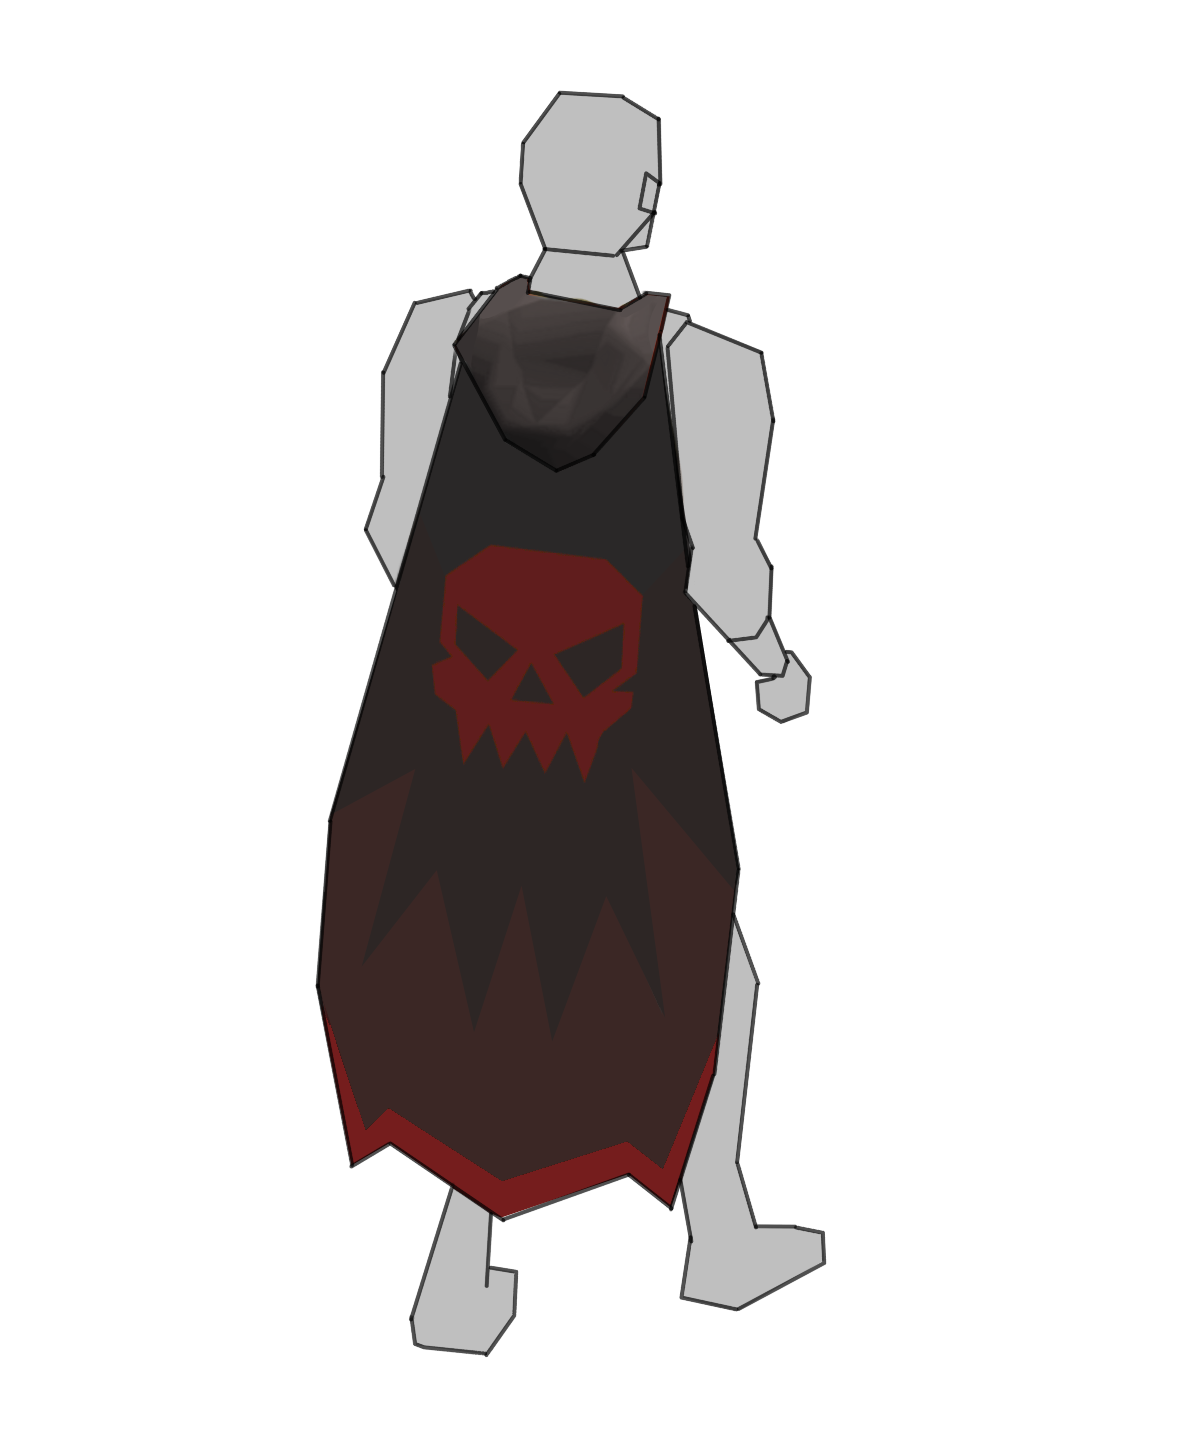
We'll also be offering up a Deadman-themed spin on the classic Imbued God Capes, unlocked via Mage Arena II. You'll be able to dish out ferocious freezes with Ice Barrage while displaying your allegiance to the coolest god of all - in-game violence in a temporary game mode!
Even the most bloodthirsty of PvPers need a break from time to time. Where better to unwind than your Player Owned House? Unfortunately, all those muddy, bloody footprints you're leaving on the floor is a real headache for a hardworking butler. Consider picking up a lovely Deadman Rug to spruce the place up.

Rounding things out is an animation override. We've all been there: returning from a Wilderness trip, crossing that Level 30 boundary, realising we left our teleport at the bank, waddling down to the Level 20 boundary and casting a frankly embarrassing Home Teleport. This override can't hide the shame of forgetting your runes, but it will make you look significantly more awesome, with a Deadman-themed Home Teleport.
Perhaps that Home Teleport isn't quite so embarrassing if you're being sucked into a Breach of your very own and coming out unscathed! Click here for a version with an all white background instead.
All overrides will be unlocked by using the appropriate cosmetic scroll, which you�ll purchase using the Points you accumulate during Deadman: Armageddon. The scrolls themselves are tradeable, so if you hate looking good (or just have spares) you can sell them to other players.
Points are earned by doing just about anything you can think of, and don�t technically require you to fight other players (although we�d like to see you try and avoid it) so even the newest of n00bs should be able to pick up a few treasured goodies by the end of the event. If you haven�t tried Deadman before, now you have a great excuse to jump in!
More experienced players, however, will have their eyes set on the big prizes. We�re giving away a total of $25,000 this year � but you�ll have to be pretty tough to get your hands on the cash.
Last year we made some significant changes to how prizing worked and to the finale itself, in an effort to combat bad actors ruining the fun. This time, we�ve made a few tweaks.
The essence is still the same: the last player left alive in each of the Finale worlds will walk away with a nice chunk of change, with other prizes doled out via raffle. Your chances improve depending on how many points you�ve accumulated.
- Each of the five Finale winners will receive $3,000, for a total of $15,000.
- This is increased from last year, where Finale winners took home $1,000.
- One of the top five players, based on points, will win $1,000.
- Two of the top 25 players, based on points, will win $1,000 each.
- Three of the top 1% of players, based on points, will win $1,000 each.
- Two of the top 5% of players, based on points, will win $1,000 each.
- Two of the top 20% of players, based on points, will win $1,000 each.
In addition, no contestant can win twice. If you�re the last survivor and win $3,000, you won�t be eligible for any of the Points-based prizes.
If your Points total puts you higher up the leaderboard, then you'll still be eligible for all of the lower draws - assuming you haven�t won a prize already. This means that a player in the top five would be eligible for all five of the raffle draws... unless, once again, they've already won a prize.
To sum up, competitive players have a shot at winning some serious pocket money, whereas those of you just looking to dip your toes in can still take home some flashy FashionScape. Everybody wins!
We�ve learned a lot from your feedback regarding Deadman: Apocalypse, and we want to roll out some changes to the core experience for this round. Last year�s season gave us a strong foundation to build on, so now we�re looking to see just how far we can push this format without starting from scratch.
We�ll start with the Points system, since it�s fresh in our minds...
Points System
Check out this page for a breakdown of how Points worked last time around.
In short, we reckon Points were a great way to motivate players to progress through Deadman, even if they�re not the most seasoned PvPer. They also drove players towards Breaches, creating hotspots where players could maximise their gains, while we maximised the carnage. This year, we�ve ramped things up a bit.
To start with, we�ve had a few new combat activities for you to participate in:
- Scurrius - 5 Points per kill.
- Moons of Peril - 15 Points per Lunar Chest open.
- Fortis Colosseum - 100 Points per Sol Heredit kill.
We�ve also rejigged some of the activities from the original list:
- Giant Mole - 12 Points, down from 18.
- Scorpia - 5 Points, down from 20.
- King Black Dragon - 5 Points, down from 20.
- Thermonuclear Smoke Devil - 10 Points, down from 15.
- Dagannoth Kings - 15 Points each, up from 10.
- Barrows - 10 Points per chest, down from 15, assuming you've killed all six Barrows Brothers on your run.
- Grotesque Guardians - 10 Points, up from 8.
- Sarachnis - 10 Points, up from 6.
- Skotizo - 25 Points, up from 10.
- Tempoross - 20 Points, up from 5.
- Theatre of Blood (Entry) - 100 Points, up from 25.
- Tombs of Amascut (Entry) - 100 Points, up from 50.
- TzKal-Zuk - 200 Points, up from 175.
- TzTok-Jad - 100 Points, up from 75.
- Vorkath - 10 Points, up from 5.
- Zulrah - 20 Points, up from 12.
- Wintertodt - 20 Points, up from 10.
You may remember that last time there was a 50% Points penalty after you�d killed a boss 100 times. The intention was to encourage people to move around and fight for territory in other parts of the game, but in practice, players still found it more lucrative to grind out the same content indefinitely.
This time, after 75 kills on the same boss, you�ll only receive 10% of the usual Points... rounded down. This means that your 76th Giant Mole kill would net you but a single Point. Time to move on!
We�ve also adjusted how you earn Points outside of combat:
- Quests - 25 Points per Quest Point, up from 10.
- Skilling - 10 Points per Level gained, up from 4.
- Clue Scrolls
- Beginner - 3 Points per Casket, down from 5.
- Easy - 5 Points per Casket, down from 7.
- Medium - 15 Points per Casket, up from 11.
- Hard - 20 Points per Casket, up from 17.
- Elite - 30 Points per Casket, up from 23.
- Master - 55 Points per Casket, up from 30.
- Achievement Diaries
- Easy Task - 10 Points per task, up from 4.
- Medium Task - 20 Points per task, up from 12.
- Hard task - 40 Points per task, up from 28.
- Elite task - 80 Points per task, up from 64.
- Combat Achievements
- Easy Task - 15 Points per task, up from 4.
- Medium Task - 30 Points per task, up from 12.
- Hard task - 50 Points per task, up from 28.
- Elite Task - 80 Points per task, up from 64.
- Master and Grandmaster remain unchanged.
Finally, Breaches remain one of the premiere source of Points. Last time, however, they were so good that missing a day or two could leave you floundering behind the competition. We want to keep Breaches strong, but we are adding a cap this time to keep things fair.
After earning a total of 42,000 Points from Breaches, you�ll no longer be able to earn Points there. This averages out to a cap of 3,000 Points per day, and you�ll still be able to earn the incredible loot on offer, so they�ll be well worth doing now and then. This change just means that you�ll be incentivised to spread your progression around as much as possible.
Breaches
If you'd like the full details on how Breaches worked during Deadman: Apocalypse, check out this page.
Breaches were the standout 'new' feature of Deadman: Apocalypse. Three times a day, Breaches would appear in a Single- and Multi-way combat area and send monsters streaming into the world. These monsters had juiced up stats and offered up incredible resource drops, Points and Sigils of Advanced Weaponry, which could be exchanged for Corrupted Weaponry, while also being the only means of obtaining powerful Ancient Warrior weaponry.
Obviously, this was received extremely well, and did a fantastic job of condensing PvP activity into small areas, so that you'd always have a chance at some action regardless of your Combat bracket or timezone.
Our changes aim to make Breaches feel fresh, while retaining the same chaotic fun that made them popular last time.
Region Breaches
In 2023, Breaches spawned at 03:00, 11:00 and 20:00. They appeared simultaneously in every world, and broadcasts were sent to all players letting them know where they�d spawned.
We�re keeping that system, and adding in new Region Breaches. These Breach types will rotate, so you�ll have a �regular� Breach followed by a Region Breach, and so on. One Breach per day will pick between the types at random, for a new total of four Breaches per day!
In Region Breaches, monsters spawn across an entire region, typically one outside the usual Breach hotspots. This region will gain about 30 spawn points, so you�ll want to spread out and properly comb the area to maximise your gains. At any given time, there�ll be 10 Breach monsters roaming the region for a total of 15 minutes. Once one is killed, another will spawn in.
Loot mechanics are consistent across both Breach types, although we�ve made tweaks to the loot non-MVP players receive:
- Non-MVP players will receive 1 roll on the regular drop table, rather than 2. This is largely in response to the feeling that resource drops coming from Breaches were so good that it didn't feel as worthwhile to engage with other means of obtaining them, so we'd like to tone them down a little.
- Non-MVP players will receive Chitin, a Herblore secondary whose use is covered later on in this blog.
New Breach Locations
We�ve added some new locations to the mix to freshen things up, including the newly accessible Kingdom of Varlamore! Here�s the full list:
- Northwest of the Al-Kharid Mine.
- Northeast of the Sorcerer's Tower.
- Southeast of Castle Wars.
- Southwest of the Combat Training Camp.
- North of the Colossal Wyrm Remains in Varlamore. This one is set to be a multi-combat brawl in the scenic Avium Savannah!
- East of the Hunter Guild in Varlamore.
- Northwest of Ortus' Farm in Varlamore.
- Southeast of Outer Fortis in Varlamore.
Other Breach Changes
- Brand new NPCs to battle! Some of these might come with their own (simple) mechanics to keep you on your toes, but we're not looking to spoil the fun!
- Players who still have PvP protection won't be able to attack monsters at Multi-combat Breaches. This aims to prevent players benefitting from riskier Breaches without actually being at risk.
- We'll be adding a way to figure out where a Breach is currently located if you log in too late, simply by speaking to Perdu.
- We'll no longer display the names of players that receive a unique drop (most commonly a Trinket of Advanced Weaponry). Naming players like this saw some Breaches devolve into players not engaging in PvP until they saw a player snag a unique, and then frantically trying to get into combat with them. We'd prefer to see everybody be a target - you're adventurers, not vultures!
- Breach NPCs will be made immune to the effect of Enchanted Ruby Bolts.
- Breach NPCs that aren't killed by the time a Breach finishes will stick around for 30 minutes (up from 15) before despawning.
- After earning 42,000 Points from Breaches, you'll no longer be able to earn Points there.
Combat Bracket Worlds
Separating worlds based on Combat levels has been somewhat divisive in the past. On the one hand, it gives players more reasons to try out Limited builds like Pures or Zerks, and gives more casual players a little more breathing room. On the other, some players argue that it spreads players too thin or that people 'hide' in lower brackets until the very end of the event, where they'll quickly level up to the highest bracket to avoid competition.
To combat this issue, we designed Deadman: Apocalypse's brackets so that higher Combat level worlds had higher drop rate multipliers, incentivising players to keep moving up. On top of this, Breaches proved competitive across all brackets and helped regularly condense activity so that players didn't feel too spread out, and Points encouraged players to move around the world and try different activities.
Some feedback suggested that lower-level players didn�t feel like chasing drops was worthwhile, but still wanted to challenge themselves to take on tougher content with their restricted stats. This year, we�re bringing back Combat brackets, but boosting the drop rate multipliers in the two lowest brackets to see how things shake out:
| Combat Level Bracket | Combat XP Multiplier | Skilling XP Multiplier | Drop Rate Multiplier |
| 3 to 50 | 10x | 10x | 2x, up from 1x |
| 51 to 70 | 10x | 10x | 3x, up from 2x |
| 71 to 90 | 15x | 10x | 3x |
| 91 to 110 | 15x | 10x | 3x |
| 111 to 126 | 15x | 10x | 4x |
We still think this system has real promise, and we�ll continue to iterate on it to strike the right balance.
While we�re on the topic, there are some other changes that might spice up the experience of playing a limited account build. Keep reading to learn all about �em!
New Drop Rate Multiplier Inclusions
Just like we've added new tasks for the content we've released since Deadman: Apocalypse, we're also rolling out the drop rate multipliers (listed above) to a handful of their uniques:
- Scurrius' Spine
- Blood Moon Armour pieces and the Dual Machuahuitl
- Blue Moon Armour pieces and the Blue Moon Spear
- Eclipse Moon Armour pieces and the Eclipse Atlatl
- Sulphur Blades
- Tonalztics of Ralos
- Echo Crystals
- Sunfire Fanatic Armour pieces
The Desert Treasure II bosses are a bit less simple. We plan to allow players to transfer some of their progress into the permanent Deadman World 345 � but the uniques associated with this fearsome foursome are extremely difficult to obtain on these worlds, and we feel that having an influx of them from a seasonal event would disproportionately impact Permanent Deadman�s economy.
To combat this issue, we�re considering giving these bosses� uniques a flat 2x multiplier instead of having them scale to 4x � although we�re open to feedback.
The items affected are:
- Chromium Ingots
- Awakener's Orbs
- Virtus Robe set pieces
- Ultor, Magus, Venator and Bellator Vestiges
- Blood, Ice, Smoke and Shadow Quartz
- Soulreaper Axe pieces: Executioner's Axe Head, Eye of the Duke, Leviathan's Lure, Siren's Staff.
Quest Unlocks
In Deadman: Apocalypse, progressing through Combat Brackets would unlock more quests. You can learn more about this system on this page.
We�re not making any changes to the choices players are offered when entering a new Bracket, but we do have two changes to the automatic quest unlocks:
- Merlin's Crystal and Holy Grail are now automatically unlocked in the Level 3 - 50 bracket, down from the Level 111 - 126 bracket.
- This coincides with changes to how Chivalry is unlocked, which are covered a little further down.
- Alfred Grimhand's Barcrawl is now automatically unlocked in the Level 3 - 50 bracket.
Global Loot Table
Check out this page to see how the Global Loot Table worked last time around.
Sigil Drops
One of the things that keeps Deadman feeling fresh is the opportunity to snag supplies or gear from a whole host of content, so long as you're in a dangerous area. In the past, killing NPCs with higher Combat levels provided a chance at rolling on higher tier 'sub-tables' for Global Loot, including powerful Sigils.
We�d like to give players the chance to gain new Sigils while performing Gathering activities in dangerous areas, since the risk of other players taking you down is still present even if you're chopping a tree or fishing up a storm in Catherby. The following activities will provide a rare (approximately 1 in 500) chance of a roll on the Global Loot Table, offering 50% chance of a Sigil:
- Obtaining any log via Woodcutting.
- Obtaining any ore via Mining.
- Obtaining any fish via Fishing.
- Catching any Chinchompa via Hunter.
- Harvesting any Herb via Farming.
Archaic Emblems
Archaic Emblems can be obtained via Wilderness Slayer and exchanged at the Deadman-exclusive variant of the Emblem Trader�s Shop in Edgeville. Tier 1 and Tier 5 Archaic Emblems previously had a chance to drop from any assigned NPC while on a Wilderness Slayer Task, and could then be sold on for Archaic Points to purchase supplies for your PvP activity.
Players reported that they were still receiving weaker Tier 1 Archaic Emblems even when slaying NPCs with a high Combat level. We'll be fixing this to make sure that Wilderness Slayer NPCs with a Combat Level over 100 will always drop a Tier 5 Archaic Emblem and never have it overridden.
While we're on the topic, we'll also be removing the Void Armour set from the Emblem Trader's Shop, since it was overabundant in Deadman: Apocalypse.
Blighted Overloads

Power like this always comes with a side effect. In this case, a spooky reminder that there is a skeleton inside all of us, walking around Gielinor right now. Terrifying.
This new inclusion for Deadman: Armageddon aims to spice PvP up a little. Blighted Overloads are a way to shift momentum in PvP fights, taking a short-term risk for big potential gains. They�re not quite the same as their equivalent number in Chambers of Xeric, however.
When killing monsters at Breaches, you may receive Chitin as a drop. This Deadman-only secondary can be combined with 4-dose Super Combat, Ranging, or Magic Potions (with 83 Herblore) to create a Blighted Overload. You can only consume doses of these Potions in dangerous areas.
When a Blighted Overload is consumed, you'll take 25 damage over 6 seconds at a rate of 5 damage every 1.2 seconds. For the next five minutes, you'll gain:
- 8 + 15% Attack. At 99 Attack, this is +22.
- 8 + 15% Strength. At 99 Strength, this is +22.
- 7 + 10% Ranged. At 99 Ranged, this is +16.
- 1 + 10% Magic. At 99 Magic, this is +10.
- -1 - 10% Defence. At 99 Defence, this is -10.
Every 15 seconds, if your boosted stats have decayed, they'll reset back up to the boosted level - much like an Overload in the Chambers of Xeric or Nightmare Zone. If your Defence level is more than 80% of its base value, it will decay.
After the full five minutes are up, all your boosted stats will reset to their base values - but you will not regain the 25 HP you lost.
This Potion is all about balancing risk and reward, adding an exciting new dimension to PvP battles.
Prayer Changes
It's no secret that balance between common PvP builds has worsened a little over the years, and Prayers are one of the biggest contributing issues. This is a topic we've spoken about at length in the past when we first proposed the Chivalry Prayer Scroll and during initial consultation stages for the Ruinous Powers, so we won't re-tread that ground here.
Instead, here are some experimental changes we�re introducing especially for Deadman: Armageddon:
- Chivalry will be unlocked via Holy Grail, which is automatically completed at Level 3.
- Rigour and Augury have no Defence requirement. Rigour and Augury still require their corresponding Prayer Scrolls from Chambers of Xeric.
The level requirements for these Prayers have not been changed.
We're excited to give dedicated PvPers a chance to experiment with these options in a closed environment!
Corrupted Weaponry
Obtainable as rewards from Breaches, Corrupted Weaponry are weaker, but more obtainable, versions of powerful equipment.
On the whole, we think they sat in a good spot during Deadman: Apocalypse, but their usage was lower than we anticipated � perhaps because their power levels were a bit too low. This time, we�re increasing their Accuracy by up to 100% of their originals and raising their Strength Bonuses up to 85% of their originals � with the notable exception of Tumeken�s Shadow.
We also have two new entries to the Corrupted arsenal: the Dark Bow and the Volatile Nightmare Staff.
Corrupted Dark Bow
Note that the Corrupted Dark Bow is slightly complex, in that the majority of its Ranged Strength comes from the ammunition used. Its stats will be identical to the regular Dark Bow, and its Range will be reduced from 10 tiles to 6. This weapon requires 50 Ranged to equip.
Corrupted Volatile Nightmare Staff
Just like the Corrupted Dark Bow, this one's a tad tricky since the damage of the Volatile Nightmare Staff is based either on the spell that you're using, the Magic Damage gear you've got equipped, or (for its Special Attack) your Magic level.
Additionally, the regular Volatile Nightmare Staff is renowned for being hit-or-miss when it comes to Accuracy, so we�ve avoided reducing this stat further. To compensate, the range of the Special Attack has been reduced from 10 tiles to 6. This weapon requires 50 Magic and 20 Hitpoints to equip.
Sigil Changes

Note: For a Sigil breakdown that's nicer to look at, check out this page on the OSRS Wiki!
To see the Sigils from Deadman: Apocalypse, check out this page.
Sigils are powerful items that you'll obtain during your time in Deadman: Armageddon. They serve as extra sources of power that you can use to customise your experience to suit your preferences. For example, the Sigil of the Abyss could be used to grant 10x Runes while Runecrafting, or the Sigil of the Porcupine could be used to help chip away at opponents with constant recoil damage.
Sigils have been a feature of this mode since Deadman: Reborn and have undergone plenty of changes between seasons. This time, we�re making the following improvements:
Tweaks to Existing Sigils
- Sigil of the Abyss - Rune multiplier reduced from 10x to 5x.
- Sigil of the Porcupine - Effect length reduced from 45 seconds to 15 seconds. Cooldown reduced from 2 minutes to 1 minute.
- Sigil of Last Recall - Cooldown increased from 3 minutes to 5 minutes. Adjusted to be a Tier 2 Sigil.
- Sigil of Enhanced Harvest - Resource multiplier reduced from 5x to 3x.
- Sigil of the Forager - Resource multiplier reduced from 3x to 2x.
- Sigil of Slaughter - Slayer Task Choice cost increased from 30 to 60.
- Sigil of the Ruthless Ranger - Damage increased from 5 to 15.
- Sigil of the Menacing Mage - Damage increased from 12 to 18.
- Sigil of Resilience - Hitpoints restore rate increased from 10x to 15x.
- Sigil of the Formidable Fighter - Proc damage increased from +5 to +10.
- Sigil of the Rigorous Ranger - Accuracy increased from +10 to +20.
- Sigil of the Meticulous Mage - Accuracy increased from +20 to +40.
- Sigil of the Food Master - Chance to not consume food increased from 20% to 40%.
- Sigil of the Well-Fed - Chance for double healing from food increased from 20% to 40%.
- Sigil of the Treasure Hunter - Clue Scroll drop rate multiplier increased from 2x to 3x.
- Sigil of the Augmented Thrall - Max hit multiplier increased from 3x to 5x.
- Sigil of Specialised Strikes - Cooldown reduced from 30 seconds to 20 seconds.
- Sigil of Binding - Cooldown reduced from 30 seconds to 15 seconds.
- Sigil of Faith - Chance to gain double Prayer Points increased from 20% to 40%.
- Sigil of the Serpent - Effect length increased from 1 minute to 10 minutes. Cooldown increased from 1 minute to 3 minutes.
- Sigil of Finality - Cooldown reduced from 60 seconds to 30 seconds.
- Sigil of Pious Protection - Damage reduction increased from 25% to 35%.
- Sigil of Rampage - Maximum Rampage count decreased from 5 to 3. Damage and Accuracy per Rampage stack increased from 2% to 3%. Ramage stacks reset after 6 seconds, down from 12 seconds.
We�ve also made some mechanical adjustments:
- Sigil of the Ninja has been split into three Sigils, one for each Combat style. Only one can be used at a time.
- These Sigils are the Sigil of the Swashbuckler, the Gunslinger and Arcane Swiftness for Melee, Ranged and Magic respectively.
- Additionally, Morrigan's Thrownaxes are excluded from the Sigil of the Gunslinger.
- Sigil of the Eternal Jeweller now benefits Burning Amulets.
- Sigil of Barrows is re-enabled and has been buffed since its debut during Deadman: Reborn. This Sigil prevents Barrows armour sets from degrading and adds +40% Accuracy to attacks from Barrows weaponry against players and NPCs alike.
- Sigil of Freedom is re-enabled. This was initially disabled for being extremely powerful when used to 'pass' players off to an ally as a result of a shorter PJ timer. We'll be detailing a change to the Deadman: Armageddon PJ timer shortly, and that change is why we�re comfortable re-enabling it.
Brand New Sigils
Of course, we couldn't rightfully bring back Deadman without a few new boons! Here's what we're adding:
- Sigil of Revoked Limitation (Tier 2) - Allows Revenant weapons' +50% Accuracy/Damage buff to apply to NPCs anywhere.
- Sigil of Meticulousness (Tier 3) - Grants +75% Accuracy in all styles against NPCs. This is a higher-tier variant of the Sigil of Deft Strikes.
- Sigil of Rampart (Tier 3) - Increased your Stab, Slash, Crush and Ranged defences by +100. Does not stack with the Sigil of Fortification.
- Sigil of Deception (Tier 1) - Automatically re-pickpocket NPCs until you're otherwise unable to do so. This is effectively a portion of the Trickster Relic from Leagues 4: Trailblazer Reloaded, though you'll still have a chance to fail pickpockets this time.
- Sigil of Lithe (Tier 1) - Grants 2x your Agility level as Agility XP while running, approximately every 10 ticks. Does not grant XP while in a safe zone.
- Sigil of Adroit (Tier 2) - Increases your Accuracy by 1% against players and NPCs for each Hitpoint you're missing. This means if your max HP is 99 and you're sitting at 50 HP, you'll gain +49% Accuracy against enemies.
- Sigil of Onslaught (Tier 2) - Increase the number of targets that Chinchompas and Ancient Magicks can damage from 9 to 11, so long as they're within a 3x3 radius of the initial target.
- Sigil of Restoration (Tier 2) - On successful hit, restore 10% of the damage dealt (rounded up) to your Hitpoints. This works against both players and NPCs but excludes multi-target attacks (against any targets beyond the first) and Special Attacks.
Miscellaneous Changes
These final few changes are small, but hopefully impactful:
- PJ Timer for 'defending' players increased from 8 ticks to 20 ticks. For 'attacking' players, the PJ Timer has been reduced from 24 to 20 ticks.
- Effectively, this aims to prevent scenarios where Player A is attacking Player B. Player A cannot be attacked by another player for 24 ticks, but player B can be attacked after 8 ticks. This means that if Player A scores a hit on Player B and then hides or steps underneath Player B, Player C could join the fight and attack Player B after 8 ticks, while Player A is still immune.
- This change is the reason for us re-enabling the Sigil of Freedom.
- Added an 'override' to many items to minimise large stacks of junk items being given in loot keys.
- Increased the rate at which Dragon Scimitars are stocked by shops.
- We're considering allowing players to gain XP in safe areas, but haven't yet made a decision. Let us know your thoughts on this one!
- POH Ornate Pool cooldown reduced from 3 minutes to 2 minutes.
We�d love to hear your thoughts on all these changes, but for now, let�s take a look at the big finish...
The Finale
Every good Deadman culminates in an epic finale. In the past, these momentous events have been hindered by nefarious actors and technical problems, which is why we made some drastic changes to ensure that Deadman: Apocalypse�s finale went off without a hitch.
Unfortunately, many of you watching at home felt that the viewing experience for our finale livestream left you wanting more. We missed out on huge wars between teams, saw teams hiding from each other across different worlds, and ultimately saw things conclude a little sooner than we'd have liked.
For Deadman: Armageddon, we'll be pursuing a similar style of finale but switching up the format to create a better experience.
Firstly, the Finale will be spread across five worlds. Unlike last time, these worlds will be separated by Combat bracket rather than being open to all. This means you'll likely be competing against similar builds and won't see high-level teams spreading out across worlds to try and avoid each other - you've gotta compete against the best if you want to be recognised as the best!
The iconic Deadman fog will not roll out on all worlds at the same time, but will begin to spread in the Level 45-50 World first. When that bracket has concluded, it will roll out to the 51-70 World, and so on. This means we shouldn't miss any of the action and we should be able to show off every tense moment leading up to the final showdown. Even if one finale feels 'short', those of you at home will be able to watch more chaos unfolding back-to-back!
The initial fog radius and speed at which the fog closes in will be slightly increased in the early stages. This should speed up the start of the finale and condense players more quickly to keep things moving.
We'll still have some monsters in the Finale, but we'll be looking to move them closer to the final area. Last time, we put them further away so that Breaches didn�t overshadow the PvP action, but believe we went too far in the other direction and made the monsters a non-factor. We're hopeful that this new approach strikes a healthy balance between 'is this Armageddon even happening?' and 'General Graardor wiped out my entire clan'.
After the Finale wraps up, we'll crown our winners and begin reaching out to deliver their prizes � including determining our raffle winners by random draw.
Finally, we�ll go through all your feedback and start brainstorming how we can come back even better next time!
World 345 Transfer
Last time around, we tried to inject some new life into world 345 by giving players an opportunity to transfer their seasonal progress over to the Permanent Deadman worlds so they can compete against the most dedicated PvPers in the game. We think this option was a step in the right direction, but that players carrying all their items over has an unfortunate short-term impact on the Permanent Deadman economy.
For Deadman: Armageddon, we'd like to allow players to transfer their stats just like before, alongside items in their Safety Deposit Box only (as opposed to their full Bank). 'New' items like Corrupted Weaponry or Sigils, should be deleted on transfer.
Thanks to your feedback, we have a list of further changes we'd like to make to the Permanent Deadman worlds � but we're not yet able to say whether we'll make changes or what they might be. Delivering Deadman: Armageddon on-time is our #1 priority and there's a delicate balance to be struck between devoting time to PvP in the main game and making changes to World 345.
There you have it, a first look at everything we're changing to make Deadman: Armageddon our best one yet!
Get those theorycrafting brains turning, and we'll see you for the end of the world (again) on July 19th - don't miss it!
You can also discuss this update on the 2007Scape subreddit, the community-led OSRS Discord or the Steam forums. For more info on the above content, check out the official Old School Wiki.
Mods Abe, Abyss, Arcane, Archie, Argo, Ash, Ayiza, BigRig, Blossom, Boko, Bruno, Chilly, Criminal, Crystal, Curse, Daizong, Dylan, Ed, Elena, Enigma, Errol, Gecko, Gengis, Gizmo, Goblin, Grub, Halo, Harold, Hend, Hooti, Hornet, Husky, Jalo, Jerv, Keyser, Kieren, Kirby, Kurotou, Leebleh, Lenny, Light, Liron, Mack, Manked, Markos, Maylea, Meat, Moogle, Morty, Necro, Nox, Nylu, Other, Pumpkin, Redfield, Regent, Rice, Roq, Ry, Sarnie, Saiyan, Shogun, Shroom, Sigma, Skane, Skylark, Smithy, Sova, Squid, Starry, Suharun, Surma, Sween, Tide, Titus, Torrance, Tsourorf, Tyran, Veda, Vegard, West & Wolfy
The Old School Team.