
Before signing off, we wanted to check in with you all and give a quick update on Yama and his pet in particular.
We'll be meeting as a team tomorrow to talk through general feedback and will be keeping an eye out overnight, so please keep it coming! It's been wonderful to see so many of you getting stuck in and sharing your thoughts after taking on Yama with your friends! Just beyond this section is a table highlighting any game issues throughout the day that are either ongoing or have been hotfixed, so take a peek!
Now let's chat about the pet and the Contract of familiar acquisition.
Similar to the Contracts system generally, we wanted to experiment with the idea of a skill-based pet in Old School. A flex cosmetic that you could show off regardless of content, regardless of gear setup - evergreen evidence that you're a gamer. This meant that the pet was not obtainable outside of this specific Contract.
Having seen your discussions on the topic, it's clear this is a non-starter (and for some of you, risks setting a precedent for exclusively 'buyable' pets), and it's important for us to act sooner rather than later.
We're deploying a hotfix immediately that enables Yama pet rolls. Both players inside the instance will roll for the pet, so long as they've contributed at least somewhat to the kill.
As for the Contract of familiar acquisition, we'll be adjusting it so that it provides an increased chance at obtaining the pet. Naturally with a delay between now and Contracts being activated, there's potential for us to make further tweaks if we feel that they're needed.
We're sorry for any of you who've racked up killcount and may be justifiably upset about having missed out on some pet rolls, and for not having approached the topic sooner.
Good luck down in the Chasm of Fire, we hope you're enjoying Yama, the Master of Pacts!

| Known Issues | Status |
| We're aware of issues regarding combo Rune crafting. | Hotfixed |
| We're aware that an earlier hotfix for powered staves may have resulted in issues with the Special Attack functionality of powered staves that can autocast, but don't have an autocast spell selected, namely the Volatile and Eldritch Nightmare staves. | Investigating. |
| We are investigating reports that some powered staves are not 'dragging' players consistently when used from outside their range, for example, versus the Great Olm. | Hotfixed |
| We are aware of an issue where drops are not de-spawning in the Infernal Shale mining area. | Hotfixed |
| We're aware that Solo Instance for GIM triggers Prestige-loss warning. | We have released a hotfix to prevent a message regarding Prestige Group Iron loss from displaying if there is nobody else in the instance with you. |
| We're aware that Bryophyta Staff can't alch anything unless Nature runes are inside the inventory. | Hotfixed |
| Oathplate Shards appear on the Collection Log but not under the Yama section. | We are aware of this and will look to fix this as soon as we can. |
| The Ancient Mace is not providing boosted Prayer points when used on the PoH Combat Dummy past the players current level. | Hotfixed |
| The contract for 2000 x Aether Catalysts incorrectly reads as 'Cosmic Soul catalyst'. | To Be Coldfixed |
| Diabolic Worms cannot be added to the tackle box. | To Be Coldfixed |
| Yama pet is missing from the 'All pets' Collection log page. | To Be Coldfixed |
We hope you’re wearing breathable fabrics, because today we’re heading deep into the sweltering Chasm of Fire. Yama, the Master of Pacts, has arrived…
CLICK HERE TO SHOW
Yama
- Yama is here! Chat to the Voice of Yama at the bottom of the Chasm of Fire to enter his domain and challenge him.
- Oathplate Armour, Diabolic Worms, Aether Catalysts and Runes, Demonic Tallow and Surge Potions, the Rite of Vile Transference (for upgrading Death Charge) and the Soulflame Horn are all obtainable as drops from Yama.
- A new skilling area is accessible in the north-west of the bottom floor of the Chasm of Fire. Players can mine Infernal Shale here, which can be combined with Oathplate Shards via a new Smithing activity to eventually make Oathplate Armour pieces.
- Group Iron players will lose their Prestige if they duo Yama with a player outside of their group.
Other Changes
- Similar to Aether Runes being useable in place of Soul or Cosmic Runes for charging or creating items, other combination Runes (for example, Lava Runes) can now be used for either of their respective elemental rune to charge or create items (or portals!) that require them.
- Mark of Darkness can now be re-cast before it expires. There's still a delay before re-casting so that it doesn't become a massive XP/hr method, but this should improve its usability!
- Snails in the Mort Myre swamp can now deal damage to players again. Watch out!
- Frost Nagua have a slightly increased aggro range, so should be a little more relaxing to fight than before.
- Fixed a bug where other Frost Nagua could start attacking you if one that you were in combat with used their special attack.
- Added a new sound effect when obtaining Dung from the Tombs of Amascut rewards chest.
- Fixed the Medium Clue Step featuring a zookeeper who asks for the number of animals in Ardougne Zoo.
PvP Rota
The PvP rota has moved to Period A:
- 539 - (US) - PvP World
- 318 - (UK) - Bounty Hunter World
- 548 - (Germany) - High-Risk PvP World
- 577 - (US) - Free-to-Play PvP World
- 559 - (UK) - LMS Competitive
World 390 (AUS) for LMS Competitive has been activated with this rota.
World 569 (AUS) for Bounty Hunter has been activated with this rota.
The PvP Arena is using '1 Def Pure' loadouts in Ranked Duels and Tournaments this week.
Old School's new duo-focused, endgame boss encounter is here!
Almost all of the info in today's blog is also summarised in this handy video made by the RuneScape Chronicles team!
If you can't see the video above, click here instead!
You’ll remember Yama from this dedicated blog – but to catch you all up on the latest news, all you need to know about this wheelin’ dealin’ demon is below.
Getting There
Yama resides in the Chasm of Fire in Kourend. To get there, grab your Dramen Staff (or take pride in your Lumbridge Elite Diary completion) and head to Fairy Ring DJR to wind up right next to the entrance. If you're not able to use Fairy Rings, then the Shayzien teleport in Kharedst's Memoirs (or the Book of the Dead) is a solid alternative. You'll need to have completed A Kingdom Divided to access Yama, so all of you should have a copy lying around somewhere!
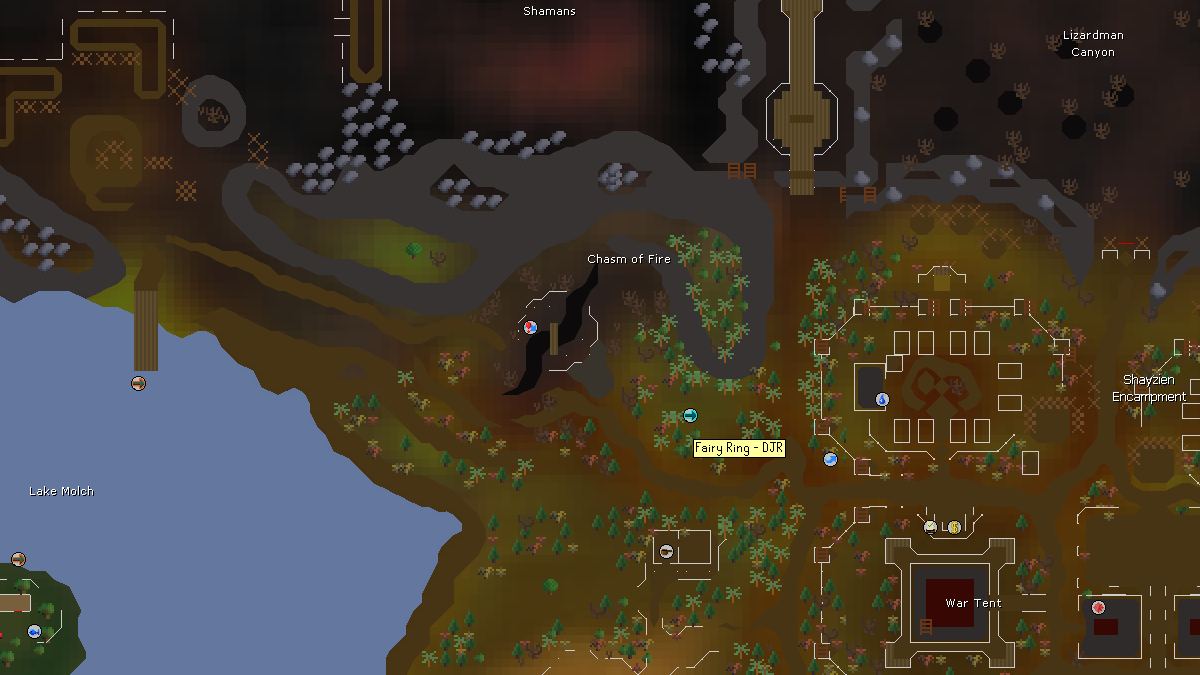
Click the image above for a clearer view, but we're sure you already know where you're headed! If you can’t see the image above, click here!
Once you're inside the Chasm, descend downwards and introduce yourself to the Voice of Yama. Players with Level 83 Agility can carefully navigate a long, spiked chain to zip from top-to-bottom in an instant. If you're not quite there yet, players with Level 73 Agility can make their way north and use a slower but much cooler set of shortcuts that involve dangling off of ledges, jumping over gaps, and dodging, dipping, ducking and diving past demons. Not that we’re biased, but it’s well worth taking this scenic route at least once.
If you can’t view the video above, click here!
You'll find the Voice of Yama right in the centre of the bottom floor. He’ll give you a piece of his mind but if you can withstand his sassy attitude, he’ll teleport you to Yama’s domain where you’ll find the demon of the hour.
Yama
You’ll find Yama sitting atop a throne that’s bigger than it has any right to be – and no, you can’t have it for your Player-Owned House. He’s got plenty of other deals on offer, though, all of which involve facing him in combat. He’ll even inhibit his own power to make it easier on you. How can you say no to that?
Defeat Yama and you’ll score powerful unique drops. Fail to defeat him, and you’ll lose something more valuable than you can possibly imagine – narratively, of course. Rest assured that everything in your Bank will be safe and sound.
Now, because Yama is so generous (or arrogant), he'll even let you bring a friend! To join one of your pals inside Yama's domain, you'll need to have spoken to the Voice of Yama until you can challenge Yama yourself. From there, rather than using the 'Travel' option on the Voice of Yama, you can use the 'Join' option and type in another player's name to join their instance, so long as they're on your Friends List. Unlike the Royal Titans, Yama must be interacted with once you're inside his arena to start the fight, so there's no need to frantically follow after your partner as soon as they're in.
Some key things to note before we move on:
- Yama is a dangerous death for HCIM and HCGIM players.
- You can teleport out of Yama by conventional means or by using Escape Crystals.
- Iron and non-Iron accounts can kill Yama together and will receive loot according to their contribution. Unique chances also depend on contribution.
- Group Iron players will lose their Prestige if they duo Yama with a player outside of their group.
- Monster Examine will be enabled immediately. He’s not shy!
- Yama's death fees will be reduced by 75% until you have at least 10 killcount.
- All of the new tradeable items will be blacklisted from Death's Coffer until their prices settle down, as normal.
- If you logged out inside the Chasm of Fire, you'll be booted out after the game update - we've changed some of the terrain down there and don't want anybody getting stuck.
- We have a handful of worlds with the 'Yama' tag for today's release, so head to any of the following if you're looking for a partner: 325 (UK), 339 (US West), 343 (EU), 394 (US East)
We’ll leave you to discover the ins and outs of the fight yourself. Just to manage your expectations, our internal playtests indicate that our initial aim of ‘one step beyond the Desert Treasure II bosses’ was dead on the money. The hope is that Yama will be a fun fight for talented players to master – and if you’re up for a little extra challenge, you can sign contracts with a little more spice.
Contracts
If you read Friday's blog, you'll have seen this section already, so feel free to keep scrolling! Go on, get out of here.
Following your feedback on last week’s preview, we’ve decided that we’d rather have Yama’s contracts start harder and get easier than risk making them solo-only endeavours right as they’re getting good.
Additionally, while we're not releasing Combat Achievements yet, we do have one in mind for completing any Contract at Yama, so you won't need to fork out millions of GP for a bunch of Contracts or attempts!
What are they?
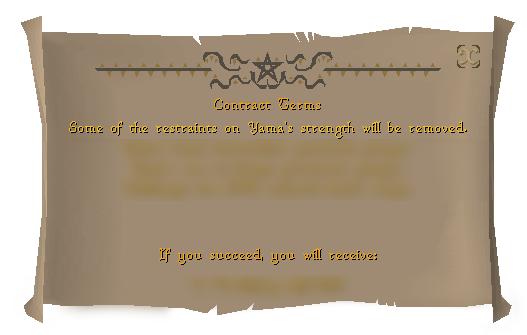
Contracts are tradeable agreements that you can bring to Yama, sign on the dotted line and he'll show you a little more of his power in a more challenging fight, with some kind of guaranteed reward up for grabs if you prove successful. This means that upon obtaining a Contract, you'll have to weigh up whether or not you think you can beat it in a single attempt, or play it safe and sell it to another player instead.
There are at least seven bespoke Contracts at the moment. Yama will show off more of his power regardless of what Contract you've signed, but each bespoke Contract should change the way that you approach the fight fundamentally, and each of them offers a different reward. This reward is fixed for each Contract and you'll know what's at stake before the fight even starts, meaning 'complete this version of the fight, and you'll walk away with this', they are not a 'make the fight slightly harder and uniques slightly more common' kind of system.
If you can’t see the image above, click here!
To be clear, Yama in his base form is the 'intended' experience and is how the overwhelming majority of players will engage with the boss for most of the time they spend engaging with it. Contracts are an added layer of spice on top for players wanting to push themselves, but the encounter, its rewards and 'time to complete' are all built off of the base experience first and foremost.
The kicker with Contracts is that you'll have to take Yama down by yourself. This means no getting a friend to carry you, but more importantly we wanted to steer clear of figuring out how to handle two players with the same Contract - do they do the fight once and get a reward each? Do they have to do the fight twice and risk falling out if one of them underperforms in one of the fights? How do Iron players factor in to all of this?
We think this is the easiest path forward to avoid friends potentially having averse interactions with each other while fighting what's supposed to be a fun boss! Perhaps we're wrong on this (recent conversations suggest that the jury is very much still out) and we're open to adjustments once people have had time to get to grips with them, but for now we reckon this is the most sensible approach. To reiterate: we are open to adjustments down the line if they're felt necessary once you've gotten hands-on!
With today's release, you'll be able to obtain Contracts and see what the rewards are, but Yama has jumbled his terms illegibly - they'll be revealed when Contracts are turned on. We're aiming to enable Contracts fully next Friday, May 23rd, giving us time to fix any issues or bugs with the core Yama fight, and allow players time to stock up on them in advance so that any competitions for a World First aren't reliant on getting lucky and being one of the first players with a specific Contract. The added benefit here is that you get Friday and the whole weekend to grind or watch the chaos unfold for yourself, and some time to get to grips with the core mechanics of the fight - similar to the late activation of Awakened variants for the Desert Treasure II bosses.
How do I get them?
You'll obtain a good number of Contracts from Yama himself, we expect that you'll passively accumulate a nice stash of them on your way to ticking off those Collection Log slots. Alternatively, you can target-farm certain Contracts with a lower intensity method if you're willing to help Yama out.
His demons have gotten lazy and could do with being kept on their toes - chat to Yama and learn a little more about exactly how you can help him out. The long and short of it is that by killing demons in the Chasm of Fire in specific ways, you'll have a chance at getting a Contract as a drop. To keep you on the right track, Yama will display a glyph that indicates how he'd like you to dispatch of his slackers - perhaps as simple as 'kill it with Magic' or 'kill it while bound', more active methods of dealing with them result in better odds at Contract drops.
This 'target farm' method is there for you if you're looking to chill out and stack up some Contracts for yourself, or if you've used up all of your stash from Yama himself and still need a couple of attempts, though it's worth noting that some contracts (particularly those with guaranteed, tradeable rewards) can only be obtained from Yama and won't be available from the common Chasm cannon fodder. An added benefit here is that doing a demons Slayer task in the Chasm should be more appealing for players who just want to sell Contracts on, so even if Yama is out of your reach for the time being then you'll still be able to benefit! On top of this, it's an easy lever for us to tweak and make more or less rare if the balance feels off - so we'll be keeping a close eye on the volume of these entering the game, their price, and the 'feel' for Irons.
One thing we will share is that the Contracts for the cosmetic upgrade variant of Oathplate armour, Radiant Oathplate, can be obtained from these demons. We expect this means they'll be in greater supply than Awakener's Orbs and that trying your hand at these contracts shouldn't break the bank like the chase for Sanguine Torva, while also being a much more 'chill' farm for Irons than spending hundreds of hours taking on bosses for any meaningful number of attempts.
This system does share some similarities to the Awakener Orb system, but differ in a number of ways. Contracts for cosmetics are target-farmable and will likely end up much cheaper than Orbs, while rarer Contracts will guarantee some kind of tradeable reward that will make them more than worth the initial cost, meaning it doesn't feel like a waste to keep coming back.
We're really excited to see you pushed to your limits and can't wait to see the kinds of off-the-wall setups and techniques you come up with. Even if you're not sure that Contracts are for you, make sure to check out the Old School RuneScape category on Twitch or Kick once they're activated. It's bound to be some of the best streamed content this year!
Rewards
We know what you’re really here for, and so does Yama, which is why he’s prepared a selection of fabulous prizes in exchange for your time and effort. Again, you can read all about these in the original blog, but here’s a quick refresher.
Diabolic Worms
These fiery critters will be a welcome addition to any high-level player's Tackle Box!
Bring Diabolic Worms with you to Piscarilius instead of Sandworms and use them to catch Anglerfish as a significantly faster rate. Simple – but effective!
Here are some slightly less simple details:
- Diabolic Worms are always used before Sandworms.
- At level 99 Fishing, your chance of a successful Anglerfish catch increases from 14% up to a whopping 40%.
- Once a Diabolic Worm is consumed, your next 'catch' roll has a 50% chance to occur a tick faster.
- XP from catching Anglerfish this way is reduced as they're easier to catch and you're learning less in the process.
All in all, this should feel somewhere between a 2-3x increase in the rate at which you catch Anglerfish, so it's definitely worth using these up when you get the chance!
Aether Catalysts
Aether Catalysts are a stackable, tradeable Runecraft resource, which you can use to craft Aether Runes; a brand new catalytic rune combining the powers of Cosmic and Soul Runes.
If you've got 90 Runecraft, you can create these by bringing Aether Catalysts, Pure or Daeyalt Essence, Soul Runes and a Binding Necklace to the Cosmic Altar. Use Magic Imbue from the Lunar spellbook and then use your Soul Runes on the Cosmic Altar to craft Aether Runes. Eventually we're sure you'll be able to craft these in the 'traditional' sense, but we don't have a true Soul Altar or Soul Talismans for the time-being - so we hope you’ve been saving those Astral Runes!
Aether Runes can be traded to other players and crafted while playing Guardians of the Rift, and they’ll be crafted in higher quantities if you're wearing the Raiments of the Eye or using Scarred Extracts. They should fit right in like any other combination rune and save you loads of Inventory space when using the Arceuus Spellbook to its fullest extent.
As the cherry on top, you can use these for charging items anywhere you'd expect to use Soul Runes, including Tumeken’s Shadow, Elidinis’ Ward (f), Soulbearer, Ring of Shadows, or your Player Owned House Portals. After today’s update other combination runes will work the same way – so you could use Lava Runes in place of Fire or Earth runes to charge items or create portals if you'd like!
Death Charge Upgrade
If you're lucky, you might be able to benefit from Yama’s mastery over the paltry parlour tricks in the Arceuus spellbook.
The Rite of Vile Transference is an untradeable scroll that can be obtained from Yama. Once read, your Death Charge will be able to convert two souls from slain enemies into Special Attack energy.
Remember that the cooldown starts on spell cast and not once you've killed an enemy, so this should always be an upgrade.
Despite being an untradeable unlock, this one is fairly common and does have a pity drop mechanic to prevent you from going dry - so long as you're able to hold your own against Yama, you’re sure to pick this up before too long!
Demonic Tallow and Surge Potions
Even though it might not feel like good fortune, being rewarded with a goopy mess of tradeable Demonic Tallow is a blessing in disguise!
So long as you've got Level 81 Herblore, you can combine Demonic Tallow with an unfinished Torstol potion and a drop of your own blood (don't worry, the game does this bit for you) to make an untradeable Surge Potion. Just as you'd expect, the Prescription Goggles and Alchemist's Amulet will help here, so make sure to cash in your Mastering Mixology rewards if you want to squeeze every last drop out of that Tallow! Oh, that’s a horrible image. Let’s move on.
Surge potions are four-dose potions which you can sip once every five minutes to restore 25% of your Special Attack energy. This five-minute cooldown will persist through logout, so if you log out with three minutes left until your next sip, you'll still need to wait three minutes after logging back in to take another. This cooldown will reset upon drinking from an Ornate Rejuvenation pool, leaving a raid, leaving the Fortis Colosseum, or dying (bit of an extreme way to dodge a cooldown, but we don’t judge).
For all you speedrunners out there, this cooldown does not tick down between waves at the Fortis Colosseum or Inferno, or between rooms at the Theatre of Blood (dying between rooms inside the Theatre of Blood and Tombs of Amascut also does not reset the cooldown) - so there's no use waiting the timer out, wait for the right moment and time those sips carefully!
Soulflame Horn
While some bits of group content do a great job of giving players roles to perform, most of it devolves into you and your friends doing the same thing you always do – but together!
But do you hear that? It’s the booming blow of the Soulflame Horn, here to spice up how you tackle group combat.
The real stand-out for the Soulflame Horn is its unique buff-focused Special Attack:

If you can’t see the image above, click here!
You'll be able to configure a radius around you and a maximum number of players to affect. Once used, the Special Attack consumes 25% per player affected to boost the accuracy of their next hitsplat (meaning only the first of a multi-hit weapon like a Scythe of Vitur or Dual Machuahuitl) within 10 ticks (6 seconds) by 100%, or guaranteeing the accuracy roll in PvM scenarios. This boost applies to regular attacks and Special Attacks the same way, so we're sure you'll find some very creative ways to get the most value out of every ear-splitting Special Attack.
Group Ironmen will be able to benefit from this effect if it's used by another member of their group. Ironmen can freely buff other players, but can only benefit from other players using this Special Attack in the following areas:
- Nightmare
- Nex
- Tombs of Amascut
- Theatre of Blood
- Chambers of Xeric
- Royal Titans
- Yama
- Let us know if you reckon we've missed any!
Keep in mind that you'll need to have Accept Aid turned on to be granted the buff (assuming you're not an Iron account and have access to this setting), so beware of any incoming Ice Plateau teleport offers from strangers!
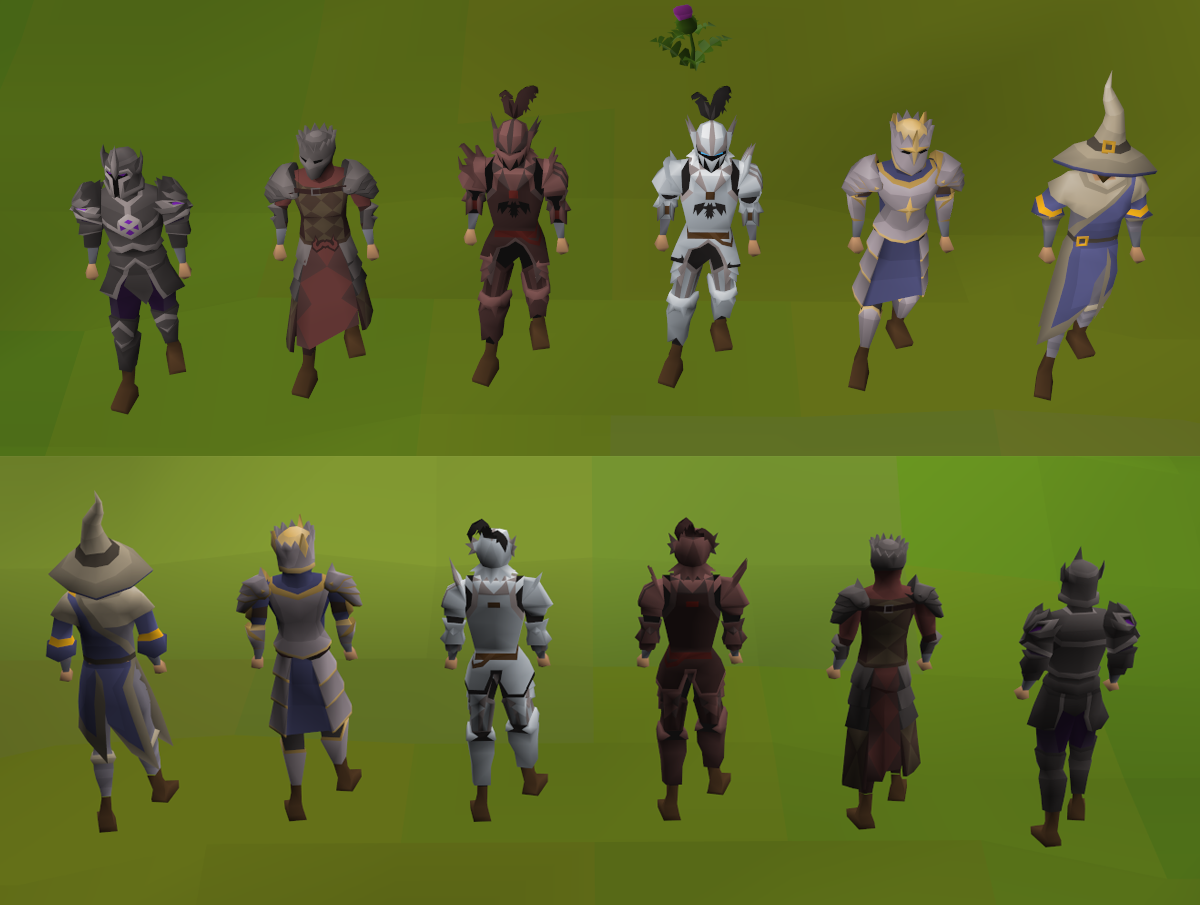
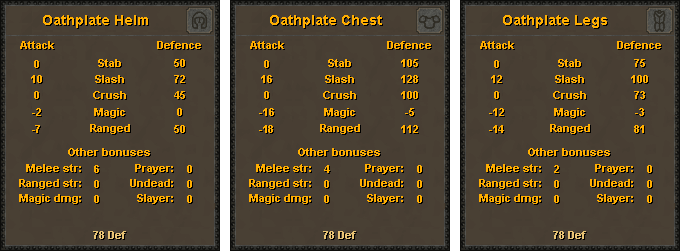
Oathplate Armour and Shards
If you can’t see the image above, click here!
Oathplate Armour (or Radiant Oathplate Armour, for the talented gamers among you) is a Slash-focused armour set for endgame players. It boasts a lot of Slash accuracy over Torva, at the cost of some Melee strength - so should shine against enemies with high Slash defence.
If you can’t see the image above, click here!
You'll be able to obtain all three pieces as drops from Yama, or craft them for yourself using Oathplate Shards.
Oathplate Shards are a reasonably common, stackable drop. If you're struggling to hit that elusive 'jackpot' moment or perhaps going dry on the last piece of Oathplate that you need, you'll be able to use these Shards in the small skilling area at the bottom of the Chasm of Fire, combine them with Infernal Shale (more on that in a moment) and smelt Oathplate bars, which you'll be able to smith into any piece of Oathplate that your heart desires! We expect that if you hit the drop rate for two pieces, you should on average have enough Oathplate Shards to craft a third.
The added benefit here is that the Shards should be a nice bit of consistent cash even if you just sell them as you get them, helping us keep profit consistent without relying heavily on things like alchables.
We know that the visuals for Oathplate have split the community a little, so there’ll soon be a survey on how you feel Oathplate performs alongside other parts of your setup and in different environments.
Chasm of Fire Amenities
While Yama may be the main attraction down in these fiery depths, there's plenty more to do!
Players can obtain Contracts by ‘dealing with’ demons in specific ways. Upon initiating combat with a demon, Yama will make a glyph appear above their head. The colour of this glyph indicates how he'd like you to dispose of them for a chance at obtaining a contract. If you're not sure what a certain colour means, The Voice of Yama or the Cultist at the entrance to the Chasm will give you a refresher.
Additionally, you'll be able to check the 'active' contract at the Voice of Yama, who will indicate the method you should use for the best possible odds at a given time.
The various methods and associated glyph colours are:
- Purple: Kill a demon using a Heavy Ranged weapon, like a Crossbow or Ballista.
- Green: Kill a demon using a Magic spell (not a powered staff), like Water Surge or Dark Demonbane.
- Blue: Kill a demon using a two-handed Melee weapon.
- Yellow: Kill a demon whilst the demon is bound, or with the damage from a binding spell.
- Red: Kill a demon with a Special attack. This one has better odds at giving you a contract than the others, since Special Attack is a finite resource.
Keep in mind that some Contracts can only be obtained from Yama himself, but Contracts for the Radiant Oathplate cosmetic variant can be obtained from killing regular ol' demons.
If combat's not your scene, you could head to the north-western section of the bottom floor and check out the new skilling area. This section of the Chasm serves as home base for Oathplate creation, so if you've got a surplus of Oathplate Shards then you best get familiar. Fortunately, a local imp is willing to give you a helping hand, if you just sign a crumpled up piece of paper – don’t worry about the fine print, it’s all boilerplate.
To take those Oathplate Shards and make them up into a piece of Oathplate armour, you'll have to get your hands dirty. Starting off, you'll need to mine (or buy) some Infernal Shale! When it comes to Mining this new ore (requires Level 78 Mining, boostable), you've got options: very low-intensity (think Shooting Stars, but not quite as AFK), active (similar to mining Mithril or Coal) or very active if you fancy a spot of tick manipulation, which you could make even more active by chiselling your shale down. For this, you'll need to obtain a special cloth from the aforementioned imp and get used to a slightly different rhythm. Good luck!
If this clip looks hellish, remember that there are much lower intensity options available!
If you can’t view the video above, click here!
Once you've stacked up a big pile of crushed Infernal Shale and Oathplate Shards, it's time to smelt some Infernal Chunks (requires Level 83 Smithing, boostable). Use the furnace to heat them up, and the pool of ichor to cool them down. Time your clicks properly and you'll be able to chew through chunks at record pace.
Now, ready those clicking fingers and head over to the anvil - maintain a steady hand and an even steadier rhythm to hammer those chunks into lovely bars, which you'll be able to use to make any Oathplate Armour piece you like at the anvil in the Chasm.
Even if you're not looking to make a piece of Oathplate, mining Infernal Shale may well prove a solid Mining moneymaker - it's hard to predict exactly how solid because the relationship between Shale and Shards remains to be seen, but keep an eye on the prices here and you may emerge from the Chasm of Fire far richer than you went in!
All that's left is for you to get down into the depths and take on Yama for yourself. Get geared, group up, and good luck!
- Similar to Aether Runes being useable in place of Soul or Cosmic Runes for charging or creating items, other combination Runes (for example, Lava Runes) can now be used for either of their respective elemental rune to charge or create items (or portals!) that require them.
- Mark of Darkness can now be re-cast before it expires. There's still a delay before re-casting so that it doesn't become a massive XP/hr method, but this should improve its usability!
- Snails in the Mort Myre swamp can now deal damage to players again. Watch out!
- Frost Nagua have a slightly increased aggro range, so should be a little more relaxing to fight than before.
- Fixed a bug where other Frost Nagua could start attacking you if one that you were in combat with used their special attack.
- Added a new sound effect when obtaining Dung from the Tombs of Amascut rewards chest.
- Fixed the Medium Clue Step featuring a zookeeper who asks for the number of animals in Ardougne Zoo.
The PvP rota has moved to Period A:
- 539 - (US) - PvP World
- 318 - (UK) - Bounty Hunter World
- 548 - (Germany) - High-Risk PvP World
- 577 - (US) - Free-to-Play PvP World
- 559 - (UK) - LMS Competitive
World 390 (AUS) for LMS Competitive has been activated with this rota.
World 569 (AUS) for Bounty Hunter has been activated with this rota.
The PvP Arena is using '1 Def Pure' loadouts in Ranked Duels and Tournaments this week.
You can also discuss this update on the 2007Scape subreddit, the Steam forums, or the community-led OSRS Discord in the #gameupdate channel. For more info on the above content, check out the official Old School Wiki.
Mods Abe, Abyss, Arcane, Archie, Argo, Ash, Ayiza, BigRig, Blossom, Boko, Bruno, Chilly, Criminal, Crystal, Curse, Daizong, Donkey, Dylan, Ed, Elena, Enigma, Entropi, Errol, Freddie, Fuzz, Gecko, Gengis, Gizmo, Goblin, Grub, Halo, Harold, Hend, Hornet, Husky, Ivory, Jalo, Jamesy, Jerv, Keyser, Kieren, Kirby, Kurotou, Leebleh, Lenny, Light, Liron, Lykos, Ludo, Mack, Manked, Markos, Maylea, Mobius, Moogle, Morty, Moz, Necro, Nin, Nox, Nylu, Ori, Other, Philomel, Pork, Pumpkin, Puppi, Rach, Redfield, Rice, Roq, Roy, Ry, Saiyan, Sarnie, Schmidt, Shogun, Shroom, Sigma, Skylark, Smithy, Sova, Squid, Starry, Suharun, Surma, Sween, Tide, Titania, Titus, TJ, Tomb, Tsourorf, Tyran, Veda, Vegard, West, Wolfy & Yume
The Old School Team.